- Home
- :
- Support and FAQs
- :
- How Do I Manually Create a New SAP Concur Profile?
For Administrators and Authorized Support Contacts:
Call +1 (855) 895-4815 and select the Authorized Support Contact option from the menu. See more information.
For End Users:
To access your dedicated User Support Desk phone number, please log into your SAP Concur system, click on Help, then click on Contact Support. See more information.
This content from the SAP Concur Community was machine translated for your convenience. SAP does not provide any guarantee regarding the correctness or completeness of this machine translated text. View original text custom.banner_survey_translated_text
How Do I Manually Create a New SAP Concur Profile?
- Subscribe
- Bookmark
- Report Inappropriate Content
If you have a new employee or someone at your company who needs to use SAP Concur, you can manually create their profile.
To create a new user profile:
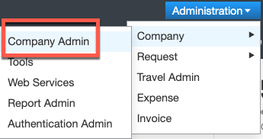
1. From the SAP Concur home screen, mouse over Administration in the upper right corner
2. From the menu options that appear, mouse over Company
3. On the sub-menu that appears, click Company Admin
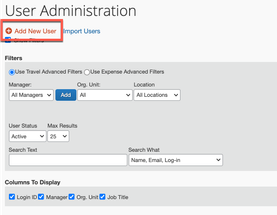
4. On the Company Administration screen, select User Administration
5. From the User Administration screen, click Add New User
6. Using the checkboxes, select the roles the user needs
The below screenshot is an example. Your site may not have all the roles pictured
7. In the CTE Login Name field, enter the username/log in ID you wish to assign to the user
Reminder: The username/log in ID must be unique. The system will notify you if the username/log in ID is already in use.
8. In the Password field, enter a temporary password for the user
9. In the Verify Password field, re-type the temporary password
10. Enter the employee's First Name and Last Name
11. In the Employee ID field, enter the employee's identification number
Note: If your company assigns employees ID numbers in your HR or Accounting systems, use this number. Also, the Employee ID must be unique to your SAP Concur site
12. Scroll down to the Expense and Invoice settings section at the bottom of the page
13. Fill out all mandatory fields that are denoted by the red bar in that field
14. Click Save
Note: Depending on your company's configuration, you may or may not have some of the fields listed in the above screenshot.


